Week 1 Tutorial: Python Setup, VS Code, and First Programs
Setup and guided practice
Install Python 3.14
These instructions are for Windows. Sign in with your own university account before starting.
1. Download Python 3.14.7
-
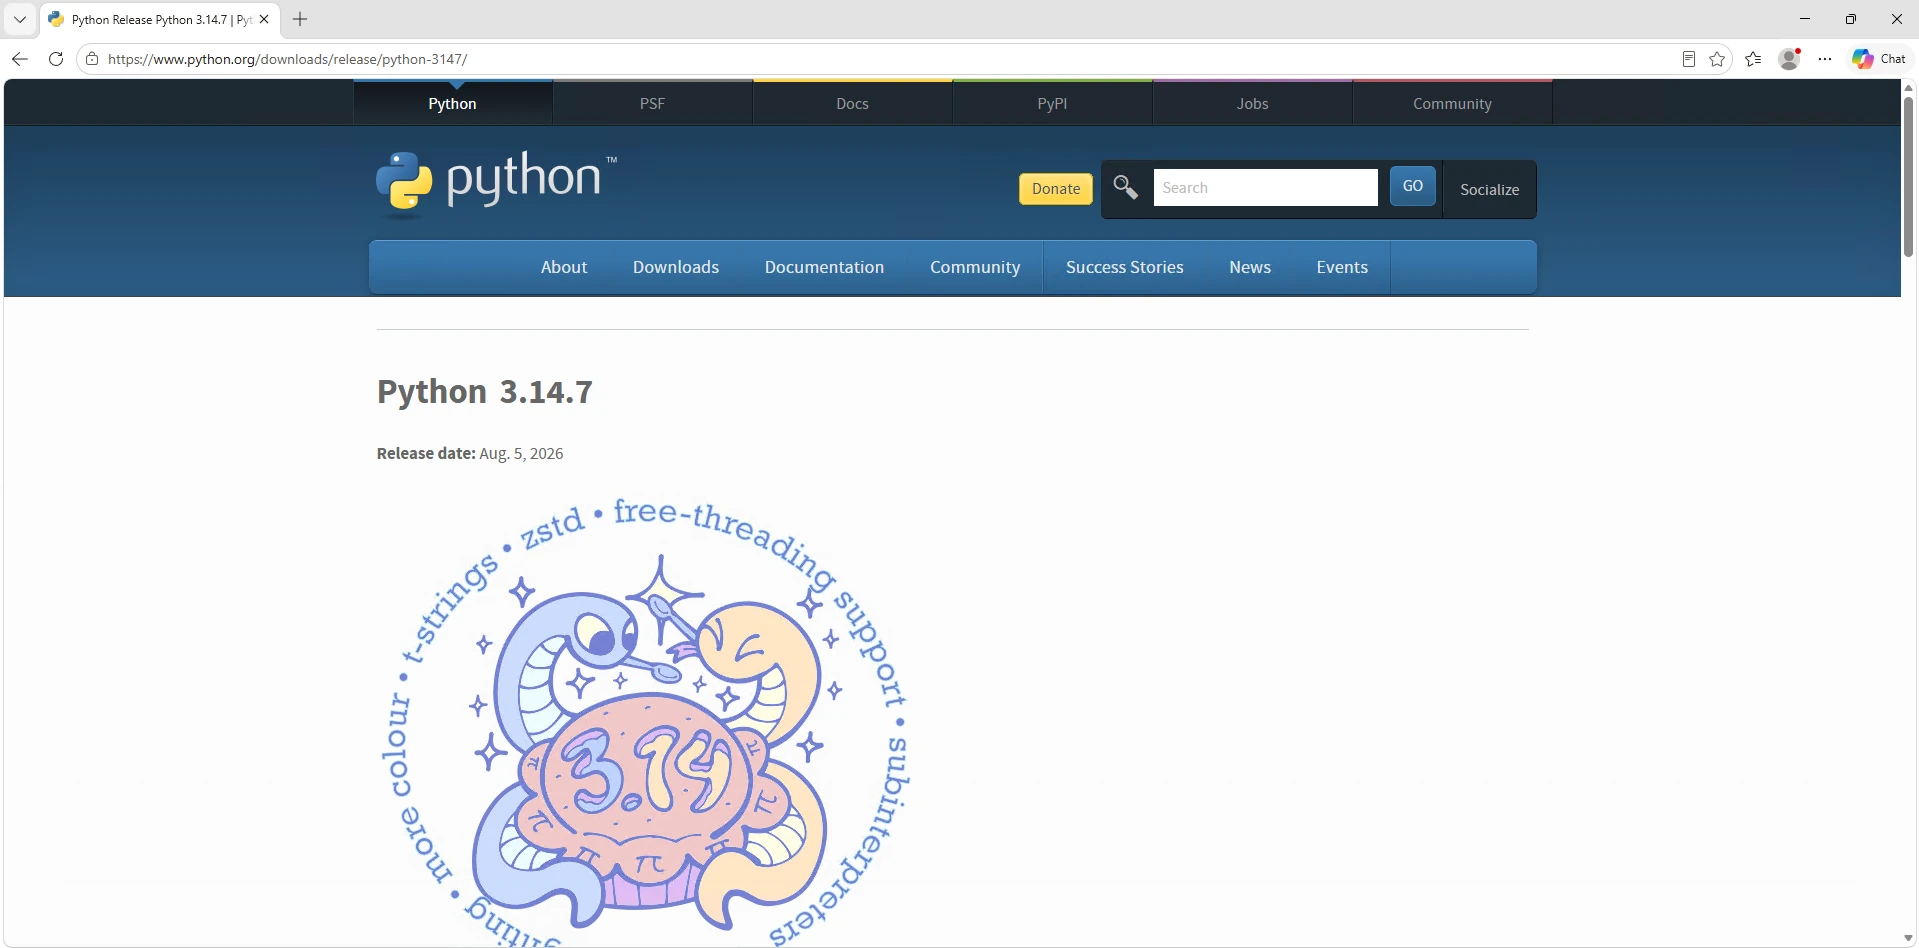
Open the Python 3.14.7 download page.
-
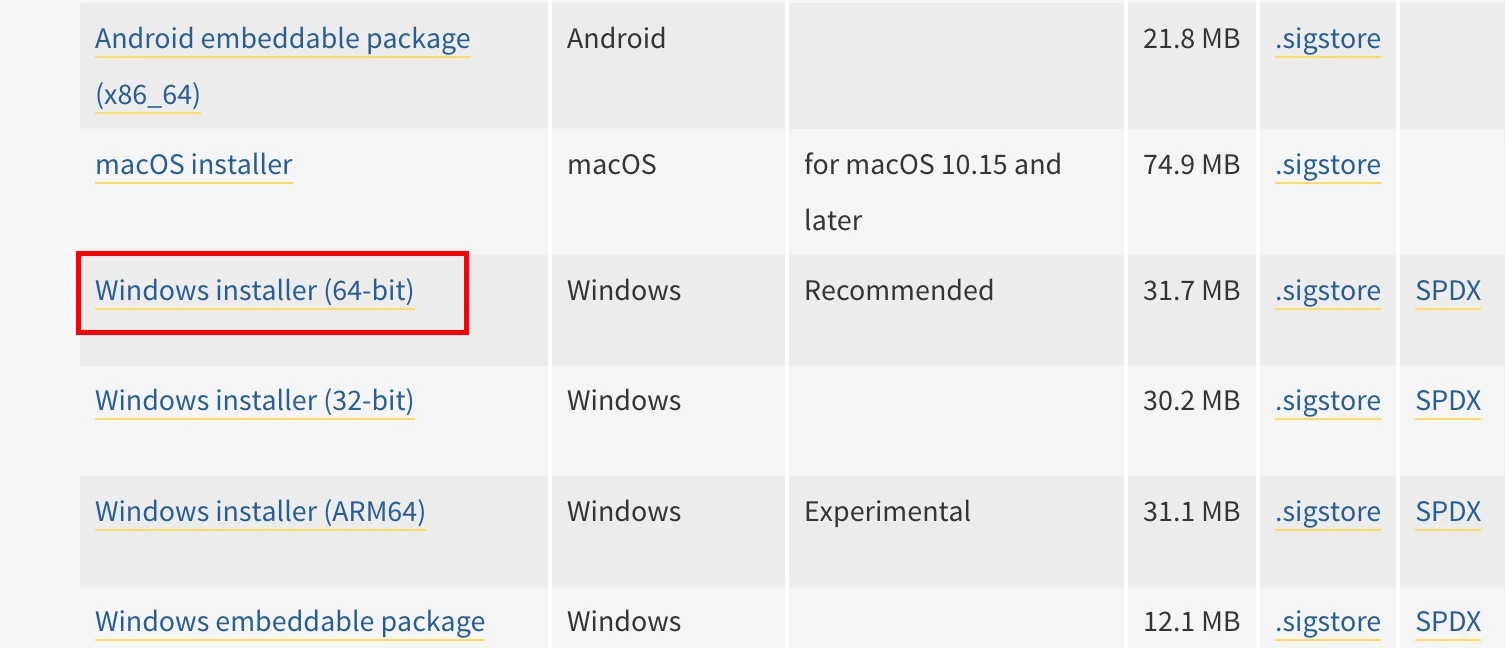
Scroll to Files and select Windows installer (64-bit) for a standard x64 computer. For an ARM-based computer, select Windows installer (ARM64).
-
Open the downloaded
.exefile.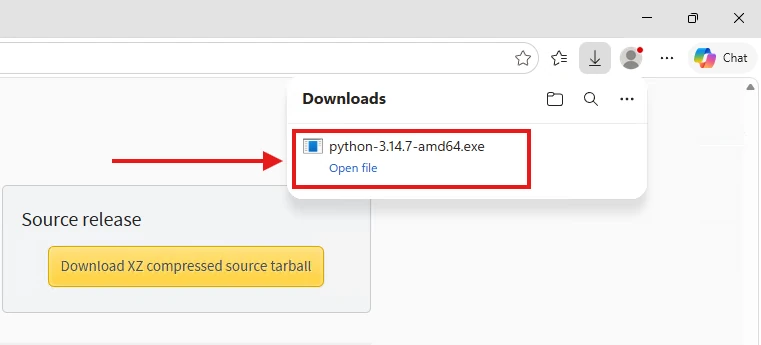
2. Install Python 3.14.7
-
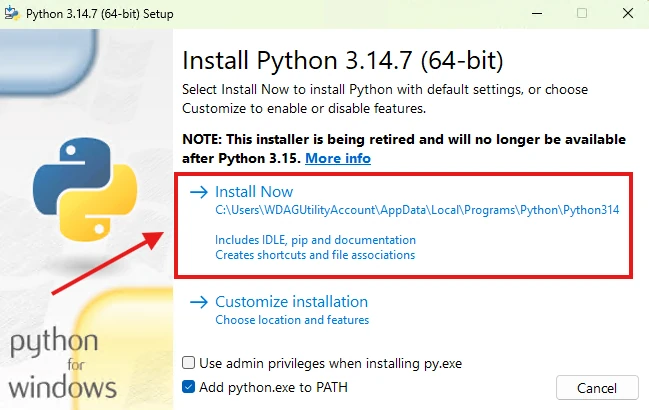
Select Add python.exe to PATH. This lets you run Python using the
pythoncommand in a terminal.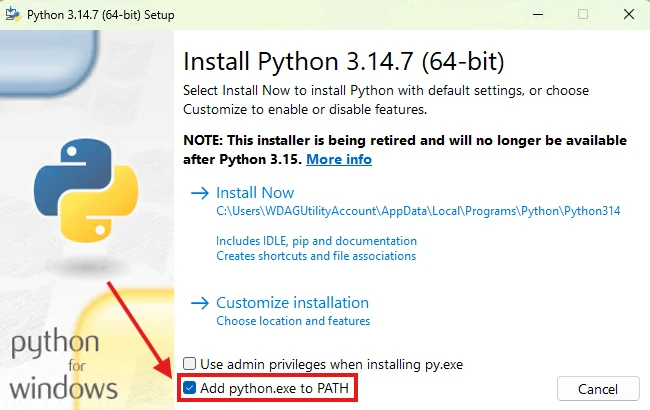
- If Use admin privileges when installing py.exe is selected, clear it.
-
Click Install Now to install Python for your own Windows account.
-
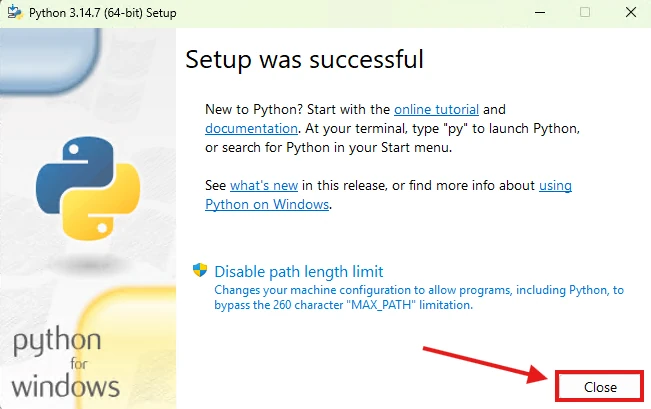
Wait for installation to finish, then click Close.
3. Check the installation
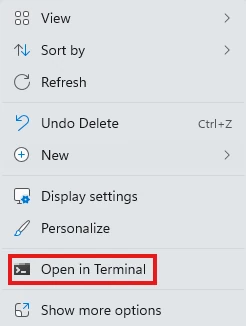
Right-click an empty space on the Desktop and choose Open in Terminal (if you don’t see it, choose Show more options first). This opens a terminal (PowerShell) already in your Desktop folder. Your Desktop is synced on lab computers, so keep your work there. If a terminal was already open, close it and open it again from the Desktop.
Type the following command and press Enter:
python --version
The output should be:
Python 3.14.7
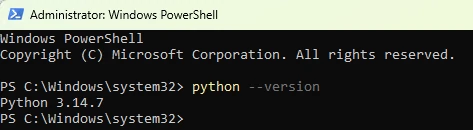
If a command is not recognised, close the terminal and open it again from the Desktop, then retry. If installation is blocked or asks for administrator credentials, ask your tutor for help.
macOS instructions
- Download the latest Python 3.14.x macOS installer from the official macOS downloads page.
- Open the downloaded
.pkgfile and follow the installer instructions, keeping the default options. - Open Applications → Python 3.14 and double-click Install Certificates.command to complete setup.
- Open Terminal and run
python3.14 --versionto check the installation. - To run a file, use
python3.14 file.pyinstead ofpython file.py.
Linux instructions
- Open a terminal and run
python3 --version; Python may already be installed. - Use your distribution’s software manager to look for Python 3.14 and install it if available. The package name and available version depend on your distribution.
- If Python 3.14 is unavailable, ask your tutor for help choosing an installation method for your distribution. Keep the existing system Python installed.
- Run
python3.14 --versionto check the installation. - To run a file, use
python3.14 file.pyinstead ofpython file.py.
Practise basic terminal commands
On Windows, right-click an empty space on the Desktop and choose Open in Terminal. On macOS/Linux, open Terminal. The commands below work in all three environments. Type each command and press Enter.
The terminal works in a current folder. Commands such as listing files or creating a folder use this location. Your terminal should already start in the Desktop folder, which is where we will keep our work because it is synced on lab computers.
1. Show the current folder
pwd
This displays the path to your current folder. A path describes a location on your computer.
2. List files and folders
ls
This lists the visible files and folders inside the current folder. The output looks different across operating systems.
3. Change folders
Your terminal should already be in the Desktop folder. Run pwd and ls to see your location and its contents.
Create the course folder now:
mkdir programming
ls
mkdir creates a folder. It does not move you into it. If programming already exists, use the existing folder.
To enter a folder, write its name after cd:
cd programming
To move up to the folder containing the current folder:
cd ..
Use quotes around names containing spaces, such as cd "My Folder". The folder must already exist.
If you get lost, close the terminal and open it again from the Desktop: right-click an empty space on the Desktop and choose Open in Terminal. This puts you back in the Desktop folder without needing to type a path.
4. Create a folder for this week
We will keep our course work in the Desktop folder.
Check your location with pwd — it should end with Desktop. If not, close the terminal and open it again from the Desktop.
Enter the course folder and create a folder for this week:
cd programming
mkdir week1
cd week1
pwd
5. Practise
- List the contents of
week1. A new folder may have no files to display. - Move up to
programmingand list its contents. - Move back into
week1. - Show the current path to check your location.
Install VS Code
VS Code is the editor we will use to write and save Python programs.
1. Download the Windows installer
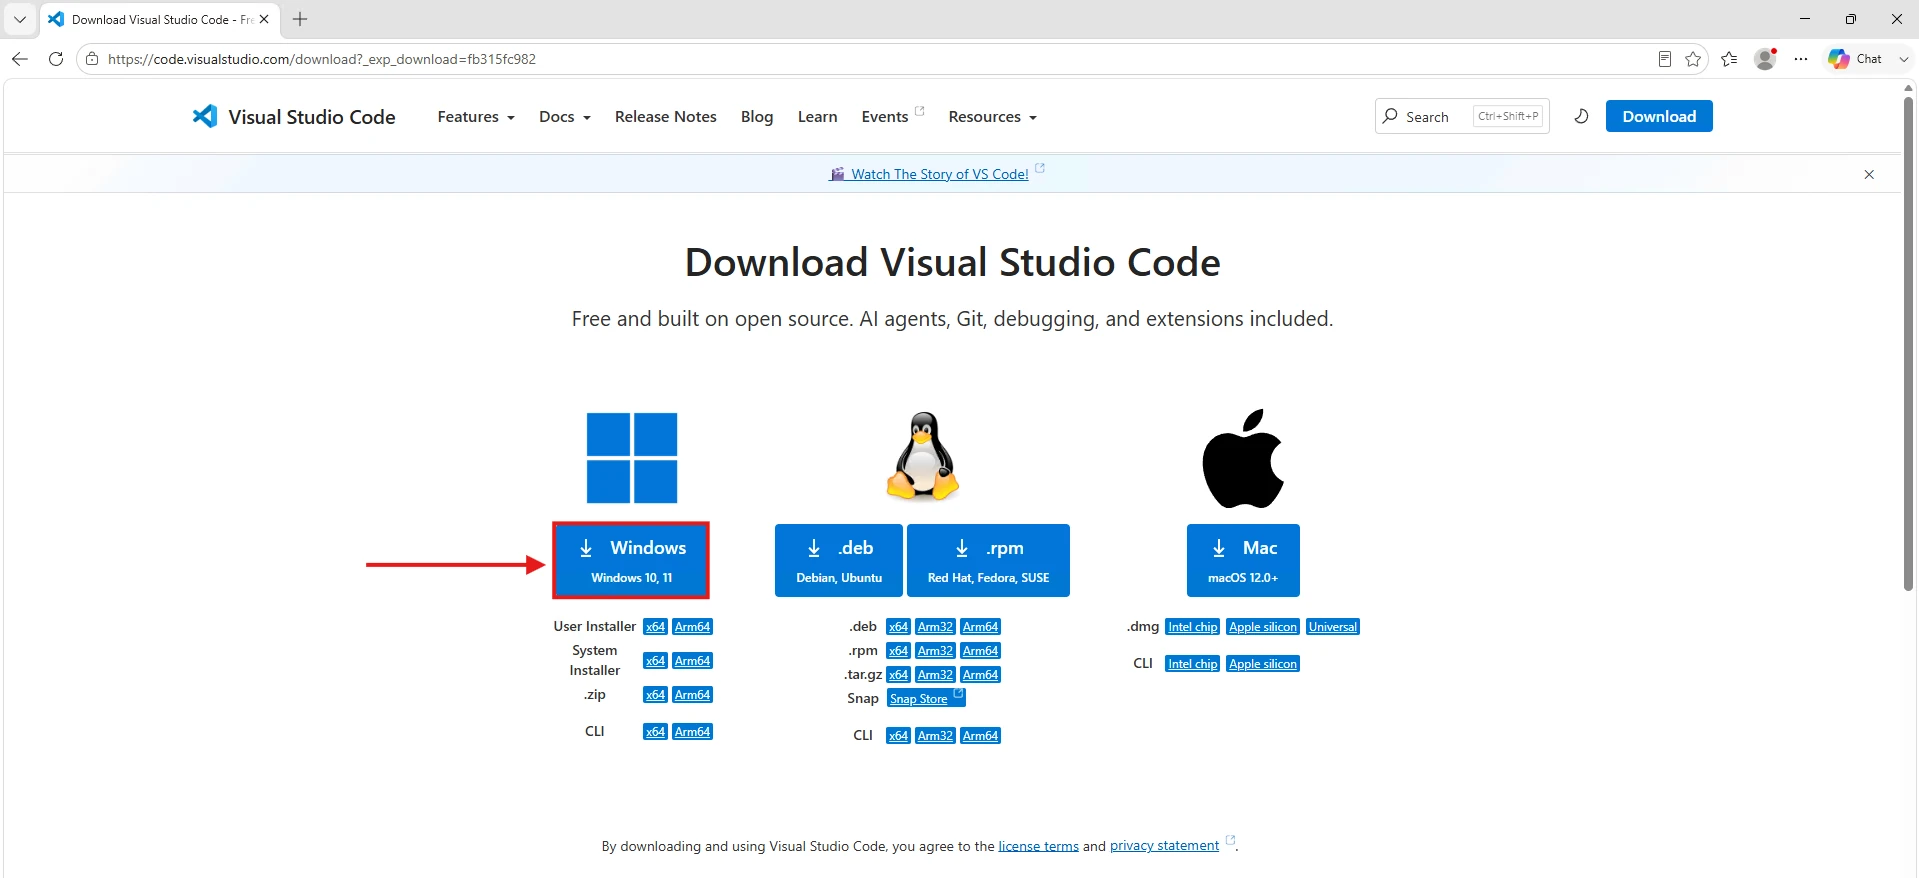
- Open the VS Code downloads page.
-
Under Windows, choose User Installer for your computer: x64 for most university computers, or Arm64 for an ARM-based computer.
-
Open the downloaded file. Its name begins with
VSCodeUserSetup.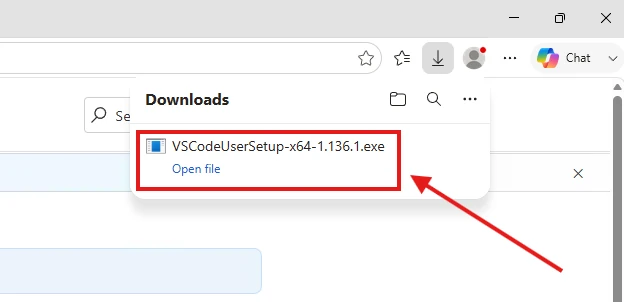
The User Installer installs VS Code for your Windows account without requiring administrator rights.
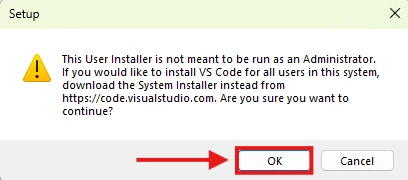
If a warning says “This User Installer is not meant to be run as an Administrator”, click OK to continue installing for your current account.
2. Install VS Code
-
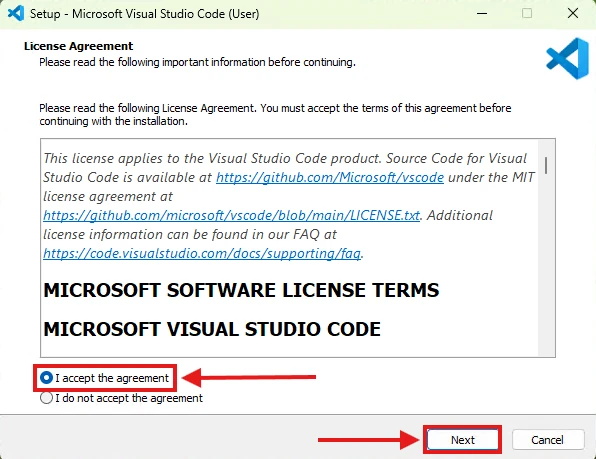
Read and accept the licence agreement to continue.
- Keep the default installation folder and Start menu options.
-
On the additional tasks screen, keep Add to PATH selected. This allows you to open VS Code using a terminal command.
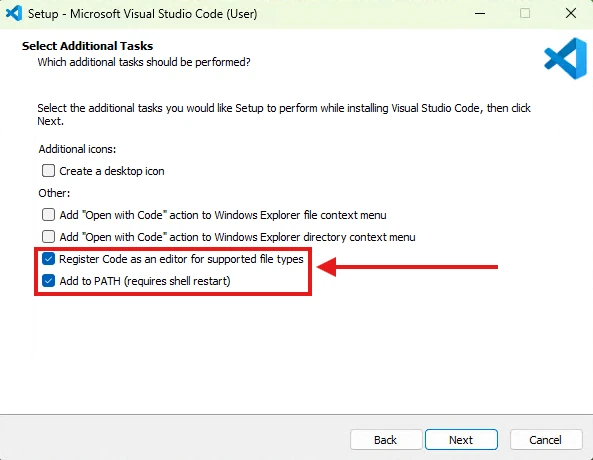
- Click Install and wait for installation to finish.
- Launch VS Code when installation finishes.
-
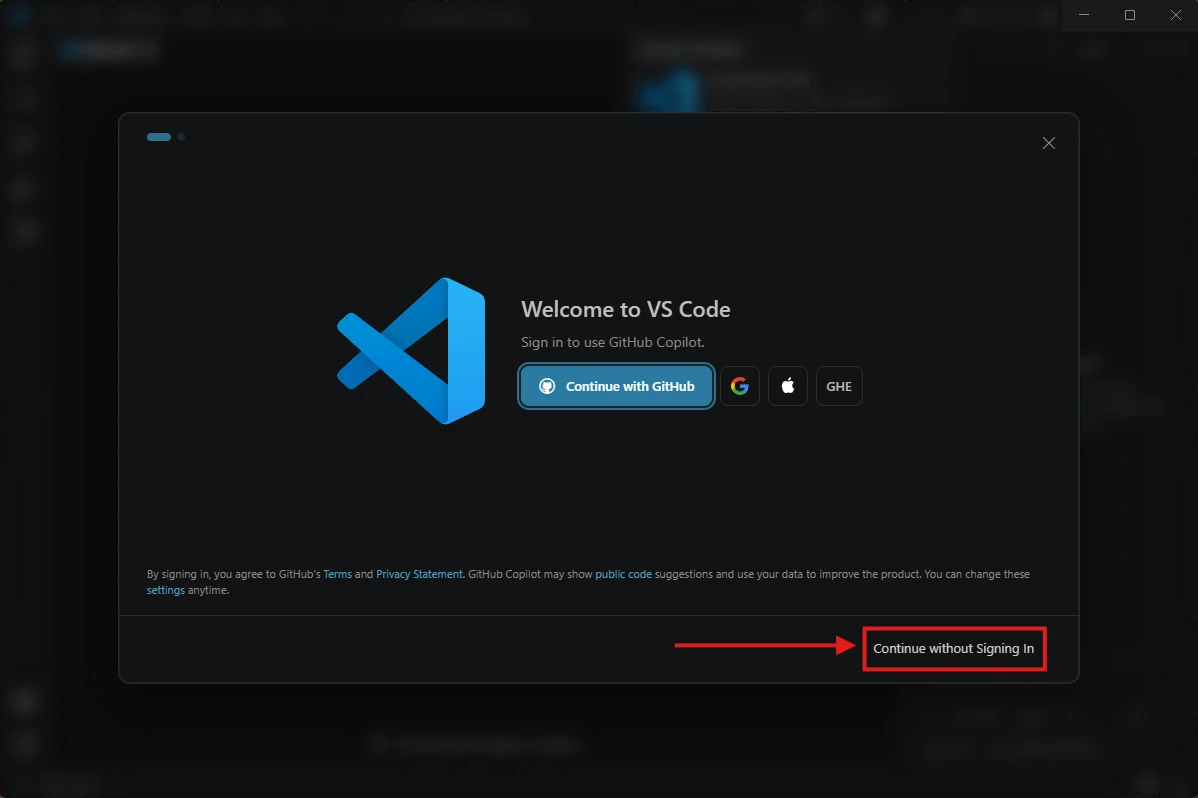
If the Welcome to VS Code window appears, click Continue without Signing In in the bottom-right corner.
-
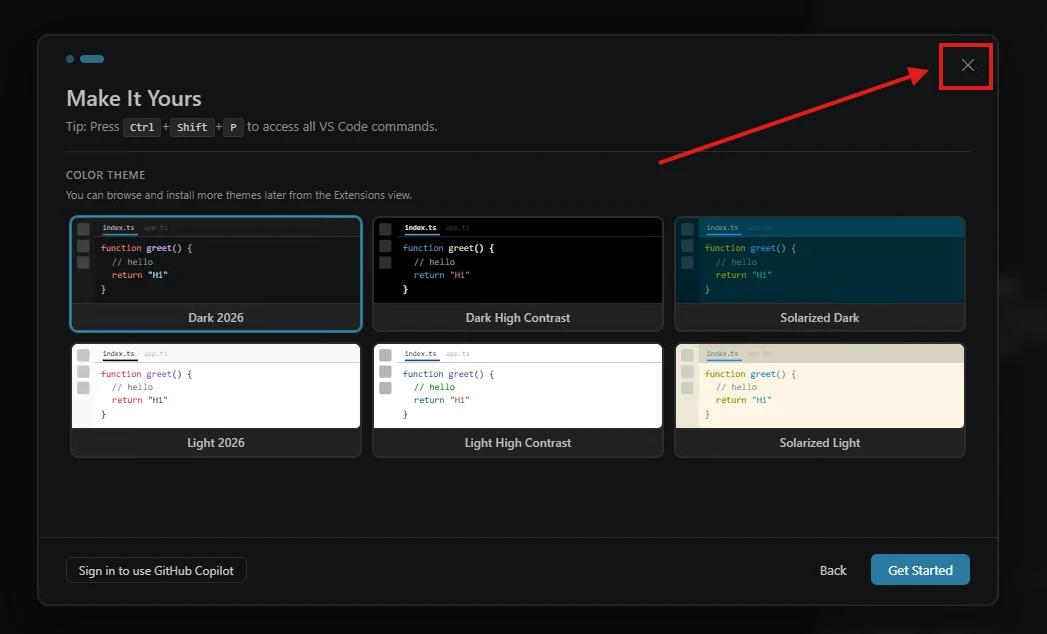
If the Make It Yours window appears, click the × in its top-right corner to close the introduction and continue to the editor.
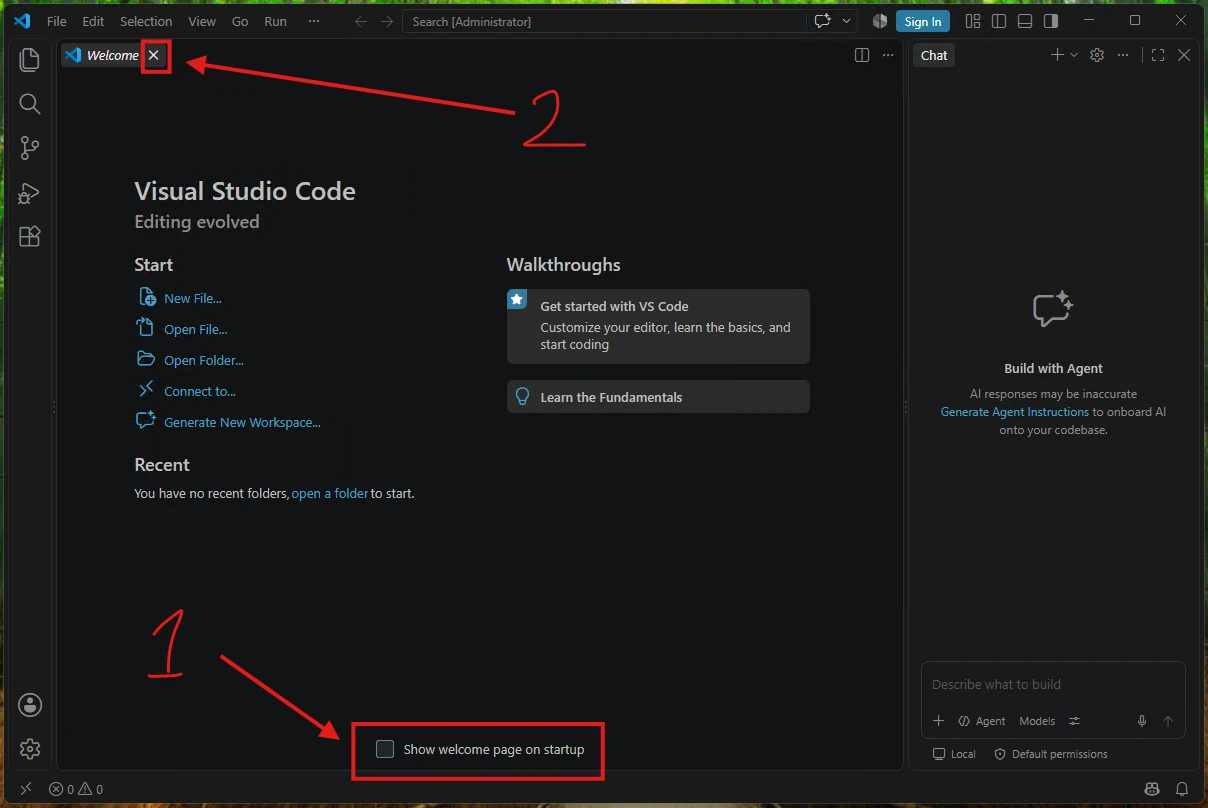
- At the bottom of the Welcome page, uncheck Show welcome page on startup.
-
Close the Welcome tab by clicking the × beside its name.
-
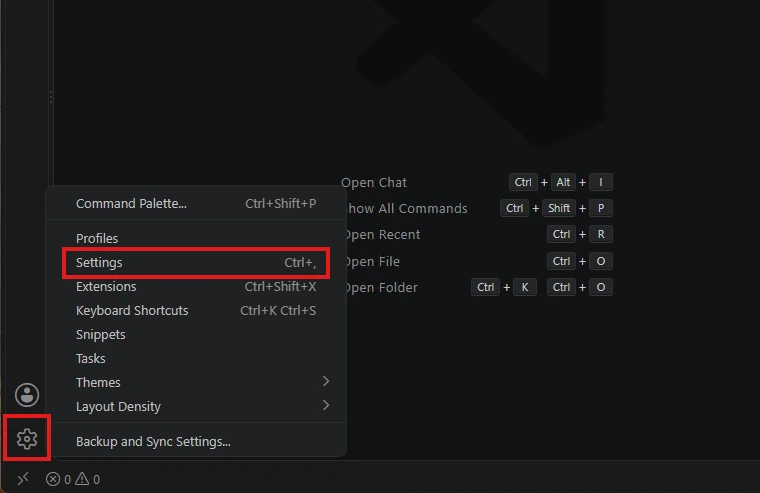
Press Ctrl+, (Cmd+, on macOS) to open Settings.
- In the settings search box, type
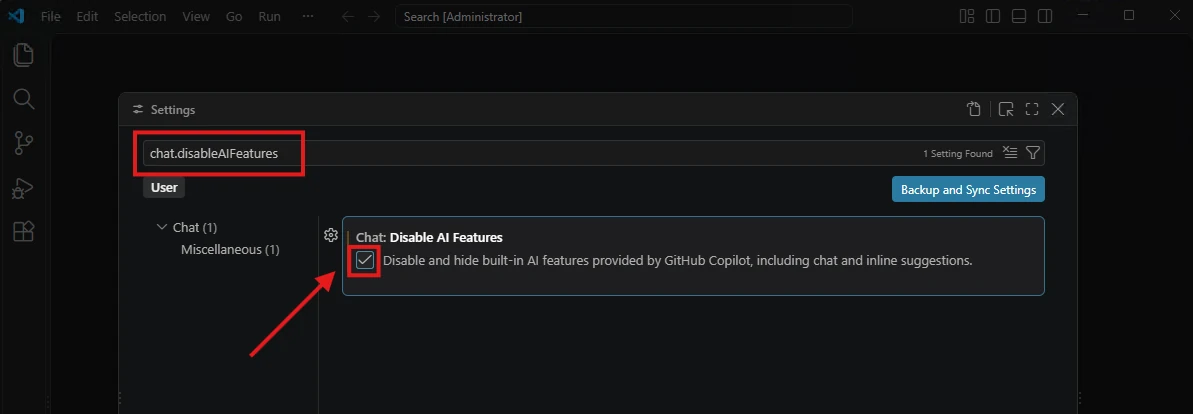
chat.disableAIFeatures. -
Check Chat: Disable AI Features to disable and hide the built-in AI features, including Copilot chat and AI code suggestions.
- Close the Settings tab.
Explore the VS Code interface
1. Explorer
- Select View → Explorer.
- This area shows the files and folders in the folder you open in VS Code.
- If no folder is open yet, you will see an Open Folder button. We will use it in the next part.
2. Editor and tabs
- The main editor area is where you read and write code.
- Open files appear as tabs. Select a tab to switch to that file.
- Line numbers help you locate a particular line of code.
- Closing a tab does not delete the file.
3. Terminal
- Select Terminal → New Terminal.
- Find the terminal panel, usually at the bottom of the window.
- Run
pwdandlsto check its current folder and contents.
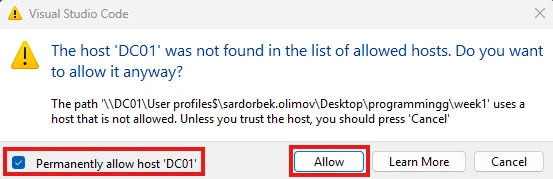
On lab computers, you may see a warning that the host DC01 was not found in the list of allowed hosts. Keep Permanently allow host ‘DC01’ checked and click Allow — this is expected because your Desktop is synced over the lab network.
This terminal works like the separate terminal you used earlier. On Windows, use PowerShell for the commands in this tutorial. If another shell opens, use the arrow beside the terminal’s + button to choose PowerShell.
We will write Python code in the editor and type commands to run it in the terminal. The program’s printed output will appear in that terminal.
4. Adjust the layout
- Drag the boundary of the Explorer or terminal panel to resize it.
- Use View → Appearance → Zoom In or Zoom Out to make the interface comfortable to read.
- Use View → Explorer to return to your files and View → Terminal to show the terminal again.
Open a working folder and create a Python file
1. Open your working folder
- Select File → Open Folder.
- Navigate to Desktop → programming → week1, the folder you created earlier.
- Select week1 and click Select Folder (Open on macOS).
- If VS Code asks whether you trust the authors of the files in this folder, select Yes, I trust the authors, since this is the folder you created for your own work.
The Explorer should now show week1. We will keep this week’s Python files in this folder.
2. Create a Python file
- In the Explorer, move your pointer over the week1 folder heading and click the New File icon.
- Type
hello.pyand press Enter. - Check that
hello.pyappears in the Explorer and opens in an editor tab.
The .py extension identifies the file as a Python file. We will write our first program in it next.
Save and run a Python program from the terminal
1. Write and save your program
In the hello.py editor tab, type:
print("Hello, Python!")
Press Ctrl+S (Cmd+S on macOS) to save the file. Save your changes before each run: Python runs the code saved in the file.
2. Check the terminal’s folder
Select Terminal → New Terminal, then run:
pwd
ls
The current folder should be week1, and the file list should include hello.py.
If you are in a different folder, move to your working folder. From a terminal opened on the Desktop, run:
cd programming/week1
In VS Code, the easiest fix is to close the terminal and select Terminal → New Terminal again — it starts in the open week1 folder.
3. Run the program
In the terminal, type the following command and press Enter:
python hello.py
If the terminal says “python is not recognized”, but python works in a terminal opened from the Desktop outside VS Code:
- Close all VS Code windows.
- Open VS Code again from the Start menu.
- Open your
week1folder and select Terminal → New Terminal. - Run
python --version, thenpython hello.py.
VS Code may still be using the PATH from before Python was installed. Restarting VS Code lets it pick up the updated PATH.
On macOS/Linux, use python3.14 hello.py.
The output should be:
Hello, Python!
python starts Python, and hello.py tells it which file to run. The printed message appears below your command in the terminal.
4. Change and run it again
- Return to the editor and change the message to include your name.
- Predict what the program will display.
- Save the file.
- Click inside the terminal and run the same command again. You can press the Up Arrow to recall the previous command, then press Enter.
- Compare the output with your prediction.
If the old message appears, check that you saved the file. If Python reports that it cannot open the file, check the current folder with pwd and the filename with ls.
Practise displaying text and numbers with print()
Create a new file named printing.py in your week1 folder. For each example below, predict the output, save the code, and run it with python printing.py (macOS/Linux: python3.14 printing.py).
1. Display text
Type this code in printing.py:
print("Welcome to programming!")
print("We are learning Python.")
Text goes inside matching quotes. The quotes mark where the text begins and ends; they are not displayed.
- How many lines of output do you expect?
- Run the program and compare the output with your prediction.
- Swap the two lines of code. Save and run again. What changes?
2. Display numbers
Replace the code with:
print(25)
print(3.5)
print(-8)
Numbers can be written without quotes. Use a dot for a decimal number.
- Predict the output, then run the program.
- Change the numbers and run it again.
3. Display text and numbers together
Replace the code with:
print("Score:", 25)
print("Price:", 3.5)
Separate the items with commas. By default, print() puts a space between items and starts a new line after displaying them.
- Predict where spaces and line breaks will appear, then run the program.
- Change the first line to display
Score: 40. - Add a third line that displays
Quantity: 2.
4. Add a blank line
Replace the code with:
print("Shopping list")
print()
print("Apples:", 4)
print("Bread:", 1)
- Predict the output before running the program.
- What does
print()with nothing inside the parentheses do? - Move that instruction to a different position and check the result.
Practise arithmetic expressions
Create arithmetic.py in your week1 folder. Predict each result before saving and running the file with python arithmetic.py (macOS/Linux: python3.14 arithmetic.py).
An expression is code that produces a value. For example, 3 + 4 produces 7.
1. Calculate with numbers
print(12 + 5)
print(12 - 5)
print(12 * 5)
print(12 / 5)
Use + for addition, - for subtraction, * for multiplication, and / for division. Python calculates the expression before print() displays the result.
- Predict the four results, then run the program.
- Change the division to
12 / 4. How is the result displayed? - Add a line that calculates
3.5 + 2.5.
2. Use parentheses
Replace the code with:
print(2 + 3 * 4)
print((2 + 3) * 4)
print(20 / 5 * 2)
Multiplication and division happen before addition and subtraction. Parentheses group a calculation that should happen first. Operations at the same priority, such as multiplication and division, are evaluated from left to right.
- Predict the results, then run the program.
- Add parentheses to the third expression so that Python divides
20by the result of5 * 2.
3. Display labelled results
Replace the code with:
print("Total cost:", 3 * 5)
print("Change:", 20 - 3 * 5)
These calculations represent buying three items at 5 each and paying 20.
- Predict the total cost and change, then run the program.
- Change both calculations for buying four items at 3 each and paying 20.
- Add a line that calculates the average of
6,8, and10. Use parentheses to add the numbers before dividing by3.
Assign and update variables
Create variables.py in your week1 folder. Predict the output of each example before saving and running it with python variables.py (macOS/Linux: python3.14 variables.py).
1. Assign values
name = "Ali"
score = 10
print(name)
print("Score:", score)
Assignment uses = to give a name to a value. Write the name on the left and the value or expression on the right. Assignment itself does not print anything.
- Predict the output, then run the program.
- Change
nameto your own name andscoreto another number. - Save and run again.
Use meaningful names such as price or total_cost. Names cannot contain spaces or start with a digit. Capitalisation matters: score and Score are different names.
2. Use variables in calculations
Replace the code with:
price = 5
quantity = 3
payment = 20
total_cost = price * quantity
change = payment - total_cost
print("Total cost:", total_cost)
print("Change:", change)
Python calculates the expression on the right of = and assigns the result to the name on the left. Assign a value to each variable before using it.
- Predict the output, then run the program.
- Change only
priceandquantityto represent four items at 3 each. - Predict the new results, then save and run again.
3. Assign a new value
Replace the code with:
score = 10
print(score)
score = 15
print(score)
An assignment to an existing variable replaces its previous value. Follow the instructions in order to find the value used by each print().
- Write down both output lines before running the program.
- Add another assignment and
print()to display a third score.
4. Update using the current value
Replace the code with:
score = 10
score = score + 5
print(score)
score = score - 2
print(score)
In score = score + 5, Python uses the current value of score to calculate the right-hand side, then assigns the result back to score.
- Record the value of
scoreafter each assignment, then predict the output. - Run the program and compare the results with your predictions.
- Change the updates so that the score increases by
8, then decreases by3.
Display values using f-strings
Create fstrings.py in your week1 folder. Predict the output before saving and running each example with python fstrings.py (macOS/Linux: python3.14 fstrings.py).
1. Insert a value into text
name = "Ali"
print(f"Hello, {name}!")
An f-string lets you insert values into text. Put f immediately before the opening quote and place a variable name inside braces {}. Python inserts its value at that position.
- Predict the output, then run the program.
- Change
nameto your own name and run it again. - Change the greeting to display
Welcome,followed by your name and an exclamation mark.
2. Insert several values
Replace the code with:
name = "Ali"
score = 18
maximum = 20
print(f"{name} scored {score} out of {maximum}.")
The spaces and punctuation inside the quotes appear where you write them.
- Predict the output, then run the program.
- Change the name and score, then run again.
-
Complete this line to display the score followed by
/and the maximum, with no spaces:18/20for the original values.print(f"{score}/{}")Fill the empty braces before running the line.
3. Display calculated results
Replace the code with:
price = 5
quantity = 3
total_cost = price * quantity
print(f"{quantity} items at {price} each cost {total_cost}.")
- Predict the complete output, then run the program.
- Change
priceandquantity. Save and run again. - Add
payment = 20and calculatechangeusingpaymentandtotal_cost. - Add an f-string that displays
Your change isfollowed by the value ofchangeand a full stop.
Predict and discuss edge cases
Create predictions.py in your week1 folder. For each example, write the exact output and explain your prediction before running it. Replace the previous example each time. Run with python predictions.py (macOS/Linux: python3.14 predictions.py).
1. Numbers and quoted text
print(2 + 2)
print("2" + "2")
print("2 + 2")
- How do the three outputs differ?
- Which line adds numbers, which joins text, and which displays the expression as text?
2. Multiplying numbers and repeating text
print(2 * 3)
print("2" * 3)
print("Hi! " * 3)
- What does
*do in each line? - Change the last line to display the message twice.
3. Parentheses change the calculation
print(2 + 3 * 4)
print((2 + 3) * 4)
- Which calculation happens first in each line?
- Explain why the results differ.
4. A variable name inside quotes
score = 10
print(score)
print("score")
- Which line uses the value assigned to
score? - If you change
scoreto20, which output changes?
5. The missing f
score = 10
print(f"Score: {score}")
print("Score: {score}")
- Does Python insert the value of
scorein both lines? - Change one character so that both lines display the same message.
6. Does a calculated value update automatically?
price = 5
quantity = 3
total_cost = price * quantity
quantity = 4
print("Quantity:", quantity)
print("Total cost:", total_cost)
- Record the values of
quantityandtotal_costafter each assignment involving them. - Does changing
quantityalso change the value already assigned tototal_cost? - Add a line after
quantity = 4to recalculatetotal_cost, then run again.
Find and fix common errors
Create errors.py in your week1 folder. Work on one example at a time, replacing the previous code.
For each example:
- Read the intended result and look for the mistake.
- Run the original code with
python errors.py(macOS/Linux:python3.14 errors.py). - If Python displays an error, read the final line of the message and find the line of code it points to. The mistake may be on that line or just before it.
- Make the smallest change needed, save, and run again.
- Check the output and explain what you changed.
1. Repair a greeting
This program should display Hello, Python!:
print("Hello, Python!)
2. Repair a calculation
This program should display 12:
print(3 * 4
3. Use the assigned variable
This program should display Score: 10:
score = 10
print("Score:", Score)
4. Put instructions in order
This program should display 15:
price = 5
total_cost = price * quantity
quantity = 3
print(total_cost)
Fix it by moving one line.
5. Correct the result
This program should display the total cost of three items at 5 each:
price = 5
quantity = 3
total_cost = price + quantity
print("Total cost:", total_cost)
Does Python display an error message? Explain how you know the result is incorrect.
6. Repair the displayed message
This program should display Ali scored 18.:
name = "Ali"
score = 18
print("{name} scored {score}.")
A program can run without an error message and still produce the wrong result. Always compare its output with what you intended.
Task 1. Event announcement
Create a file named announcement.py. Write a program that displays an announcement for a university event.
- Store the event name Programming Club, room number 204, and starting hour 15 in variables. Store the room number and starting hour as numbers.
- Use f-strings to display the announcement on three lines, as shown below.
Expected output:
Event: Programming Club
Room: 204
Starts at: 15:00
Save and run your program. Then change only the values assigned to your variables to announce Chess Club in room 108, starting at 17. Run it again and check that all three lines show the new details.
Task 2. Rectangle measurements
Create a file named rectangle.py. Write a program that calculates a rectangle’s area and perimeter.
- Store the length 8 and width 5 in variables. Both measurements are in centimetres.
- Choose the expressions needed to calculate the area and perimeter, and store both results in variables.
- Use f-strings to display the measurements and results in the format below.
Expected output:
Length: 8 cm
Width: 5 cm
Area: 40 square cm
Perimeter: 26 cm
Save and run your program. Then choose a different positive length and width. Calculate the expected area and perimeter on paper before changing only the two starting values in your program. Run it again and compare both results with your calculations.
Task 3. Score updates
Create a file named score.py. Write a program that shows how a player’s score changes during a game while keeping a record of the starting score.
- Store a score of 20, earned points of 8, and a penalty of 3 in variables.
- Before changing the score, save its value in a separate variable by assigning from the score variable. Do not write the starting number twice.
- Update the score by adding the earned points, then display it.
- Update the same score variable by subtracting the penalty, then display it again.
- After both updates, display the saved starting score and the final score together.
- Use f-strings for the three output lines.
Expected output:
After earning points: 28
After penalty: 25
Starting score: 20; final score: 25
Save and run your program. Then change only the starting values to a score of 30, earned points of 12, and a penalty of 5. Write down the three expected output lines before running it again.
Explain why the saved starting score keeps its value when the score variable changes. What would happen if you saved the starting score only after applying the earned points?
Task 4. Event budget
Create a file named budget.py. A club has a budget of 200 for an event. It buys 12 notebooks at 6 each and 8 pens at 3 each. Room hire costs 50. All amounts use the same currency.
Write a program that stores the starting information in variables and displays:
- The starting budget.
- The total cost of the notebooks.
- The total cost of the pens.
- The room hire cost.
- The total spending.
- The remaining budget.
Choose your own variable names and expressions. Store calculated results in variables and use f-strings to give each output value a clear label.
Before running your program, calculate the expected costs, total spending, and remaining budget on paper. Save and run the program, then compare its output with your calculations.
Next, change only the quantities to 15 notebooks and 10 pens. Predict the new total spending and remaining budget before running again. Check that every affected result updates correctly.
Optional challenge: The club holds a second event using the remaining budget from the first event. It buys 2 notebooks at the same unit price and 3 pens at the same unit price, with no room hire cost. Extend your program to display the balance after each event. Calculate the second event’s costs from variables and use the first event’s calculated balance rather than typing it as a number.
Task 5. Swap two values
Create a file named swap.py. Start with:
a = 12
b = 35
Write a program that exchanges the values of a and b, then displays:
a: 35
b: 12
Requirements:
- Use one extra variable to temporarily keep a value.
- Do not write
12or35again after the two starting lines. - Use f-strings to display the results.
Task 6. Rotate three values
Create a file named rotate.py. Start with:
a = 10
b = 20
c = 30
Write a program that moves the original values as follows:
areceives the original value ofb.breceives the original value ofc.creceives the original value ofa.
Expected output:
a: 20
b: 30
c: 10
Requirements:
- Use one extra variable to temporarily keep a value.
- Do not write
10,20, or30again after the three starting lines. - Use f-strings to display the results.
Task 7. Recover the starting value
A number went through these steps:
- Increased by 7.
- Multiplied by 3.
- Decreased by 6.
The final result was 45.
Create a file named recover.py. Start with:
final_result = 45
Write a program that works backwards to recover the starting number.
Requirements:
- Calculate the starting number from
final_result; do not type the answer directly. - Use an f-string to display the recovered starting number.
Before running your program, calculate the starting number on paper. Run your program and compare the results.
Task 8. Transfer between two accounts
Create a file named transfer.py. Two accounts have balances of 150 and 80. Transfer 35 from the first account to the second.
Write a program that:
- Stores both balances and the transfer amount in variables.
- Displays both balances and their combined total before the transfer.
- Updates both balance variables using the transfer amount.
- Displays both balances and their combined total after the transfer.
Calculate each combined total from the balance variables at that stage. Use f-strings to label the results.
Before running your program, predict the balances after the transfer. Run your program and check that the combined total stays unchanged.
Task 9. Convert a race time
Create a file named race.py. A runner completes three laps:
| Lap | Minutes | Seconds |
|---|---|---|
| 1 | 2 | 15 |
| 2 | 2 | 8 |
| 3 | 2 | 22 |
Write a program that:
- Stores the minutes and seconds for each lap in separate variables.
- Calculates each lap’s time in seconds.
- Calculates the total time and average lap time in seconds.
- Displays the results using clearly labelled f-strings.
The runner wants to complete all three laps in 6 minutes and 30 seconds. Assume the first two lap times stay unchanged.
Store the target minutes and seconds in variables. Calculate and display:
- The third-lap time needed to reach the target, in seconds.
- How many seconds shorter this is than the original third-lap time.
Before running your program, calculate the expected results on paper. Run your program and compare the results.
Task 10. Move a point
Create a file named point.py. A point starts at x = 3, y = 2 and makes these moves in order:
- Right by 8 units.
- Up by 5 units.
- Left by 4 units.
- Down by 9 units.
Write a program that:
- Saves the starting coordinates in separate variables before moving the point.
- Updates
xoryfor each move. - Uses f-strings to display the position after each move, in the form
(x, y).
After all four moves, calculate and display the changes needed to return to the starting position:
- The horizontal change: starting
xminus currentx. - The vertical change: starting
yminus currenty.
A positive change means right or up. A negative change means left or down.
Apply these calculated changes to x and y, then display the position to check that the point has returned to its start.
Before running your program, predict the position after each move. Run your program and compare the results.
Task 11. Reconstruct missing code
Create a file named missing.py. Complete the three missing expressions:
a = 6
b = 4

a = ___
print(f"Stage 1: a = {a}, b = {b}")

b = ___
print(f"Stage 2: a = {a}, b = {b}")

a = ___
print(f"Stage 3: a = {a}, b = {b}")
Required output:
Stage 1: a = 10, b = 4
Stage 2: a = 10, b = 40
Stage 3: a = 30, b = 40
Requirements:
- Replace each
___with an expression using bothaandb. - Use
+,-, and*exactly once each across the three expressions. - Do not use numbers in the missing expressions.
- Do not change any other lines.
Then change only the starting assignments to:
a = 8
b = 3
The same expressions must produce:
Stage 1: a = 11, b = 3
Stage 2: a = 11, b = 33
Stage 3: a = 22, b = 33
Run your program with both sets of starting values and check every output line.